sanctuary 19 Posted May 17, 2006 I am surprised the GR faces look that nice inside of OFP, great job people Share this post Link to post Share on other sites
ag_smith 0 Posted May 17, 2006 If anyone needs blood textures contact me, for variety i made 10 different ones i randomly used. Hey Shadow, feel free to send them my way, I could make use of them for some textures already submitted to me, that don't have the bloody versions yet. Thanks! Share this post Link to post Share on other sites
Shadow NX 1 Posted May 18, 2006 Will do that as soon as im done, this weekend i guess... just noticed i have to reposition the mouth on all of my faces a bit...darn ---EDIT--- Found some time, PM is on its way to Agent Smith including the Russian faces and a set of 10 .psd bloodlayers Share this post Link to post Share on other sites
sputnik monroe 102 Posted May 18, 2006 Ok here is my shot at a tutorial. Download and use this PSD as a template.  http://www.myfilelink.co.uk/file.aspx?id=e20a4d5aa6bc4bc49fa0d76cf112ed80 Step One: Open up a Ghost Recon face TGA. Step Two: Click on image (to the right of File and edit) in the image drop down options click on image size. Change the size to  435x231 pixels. (make sure constrain proportions is turned off) Step Three: Using the rectangle marquee tool select the entire image and Press Ctrl+C to copy it. Then close the image. Step Four: Open the template.psd. Press Ctrl+V to paste the image you resized and copied earlier. Step Five: Use the move tool to move the pasted face into position. The template has a second layer with two red dots and a line. Try to line up the eyes with the dots and the point where the lips come together with the line. The most important point to line up is the mouth. Example Picture Step Six: Once all is aligned delete the layer with the red dots and line. They are no longer needed. Step Seven: You’ll notice a sliver of the template face running horizontal across the top of the head between the black area and the top of the new face. To fix this use the rectangle marquee tool to select a horizontal area of the new face equal in size to the gap. Step Eight: Press Ctrl+C and then Ctrl+V. This will copy the selected area and then paste it as a new layer. Use the move tool to move the new layer into a position that covers the gap. Excellent the gap is gone Step Nine: Now to remove the obsolete ears. Select the clone stamp tool. I set the brush size for it to 43 and 59% hardness.  Hold ALT and click the area you’d like to clone, next click and hold down the left mouse button. You’ll notice a crosshair next to the giant round stamp circle. This crosshair marks the area that will be cloned into the brush circle when you let off the left mouse button. Give it a shot and clone over the two ears so it looks like this… Look Ma no ears. Step Ten: Now we are going to do some work on the real ear texture. Using the rectangle marquee tool select the ear texture in the top right corner of the template. (this will be on the background layer) Step eleven: Using the rectangle marquee tool again while holding down the Alt key select the eye texture. (holding Alt and using the marquee tool will deselect the area) It should looks like this. Step Twelve: Copy and paste the selected area as a new layer. Step Thirteen: Go up and click on Image (between edit and laayer). Scroll down and click adjustments and then select hue/saturation. You should see some sliders titled hue, saturation and lightness. Move the sliders around until the ear matches the skin on the face. To be continued in next post… (five image rule) Share this post Link to post Share on other sites
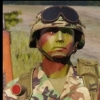
sputnik monroe 102 Posted May 18, 2006 Step Fourteen:  Now we will begin work on the eyes. First we’ll need to close the existing eyes. I use the smudge tool set to brush size 12 hardness 100. With it on those settings I go around the eyeballs and gently smudge the eyes closed. Until it looks like this…  You might try the clone stamp tool. This is one step where you’ll just have to experiment. Step Fifteen: Now using the circle marquee tool select the pupil of the eye in the top right corner of the background layer. If you have trouble selecting the whole pupil in one try, simply hold shift and do it again to add to the selection. Step Sixteen: Copy and paste the selection as a new layer. Then go up to image then scroll down to adjustments and then click on hue/saturation. Move the hue slider to change the eye color. Also try moving the saturation and lightness sliders. The face I am using in this tutorial had grayish brown eyes. So I simply desaturate the default brown eye a bit. Step Seventeen: Now for the mouth. Select the mouth using the circular marquee tool. Then copy and paste it as a new layer. Step Eighteen: Go up to Edit and scroll down to transform and then click on scale. You should see this thing… Step Nineteen: Click on the right center point and stretch the mouth to the fight a few pixels. Repeat for the left side. The reason for widening the mouth like this is so it matches up with the 3D mouth in game. Other wise the lips are smaller and you get a Batman Joker look. Step Twenty: Use the blur tool to soften the edges of the mouth layer. After you stretch the mouth layer out it’s likely have a few sharp lines around the edges that clash with the background. If the face you are converting has no face paint you can skip steps 21 through 23 Step Twenty One:  press Ctrl+Shift+N and click ok on the prompt that’ll appear. You’ve now created a blank layer. Step Twenty Two: Using the eye dropper tool, click on the face layer at a location with face paint. Step Twenty Three: select the Brush tool and select a nice brush. Paint over the ear texture in the top right. Try to space it out some and experiment with the smudge tool. When you’re satisfied, use the eraser tool to erase any scribbles that may have tracked out onto the rest of the face or the eye texture. This step is needed if the face has face paint. Other wise the ears will look strange. Step Twenty Four: Go up and select Layer then scroll down and click on merge visible. Step Twenty Five: Go up to Image then scroll down to adjustments and finally click on brightness/contrast. Move the brightness slider down to -20. The image will now look too dark. The face will appear much brighter in Flashpoint though. This step is necessary to ensure the face doesn’t look like a bleached out corpse in game. Step Twenty Six: Save the image as a TGA and you’re technically done. Optional: You could also save the face as Face.Jpg and drop it in your user folder in Flashpoint. If you have Offtimes GROM installed you can fire up the test mission I made to check out how the face looks in game. This is a useful step to see if anything needs tweaked. Here is the test mission. http://www.myfilelink.co.uk/file.as....7592f23  Well let us see how this Marine turned out… Well I don't think it's too bad. The left eye needs a little more work. The screenshot is also a bit dark as I used print screen instead of fraps. Share this post Link to post Share on other sites
CameronMcDonald 146 Posted May 19, 2006 Looks great, man! Share this post Link to post Share on other sites
Shadow NX 1 Posted May 19, 2006 I would post some previews if Cameron would be so kind to send me his edited RHS_Motorized Infantry ^^ Share this post Link to post Share on other sites
sputnik monroe 102 Posted May 19, 2006 I'll be done with the Ethiopian faces soon. Which brings me to a question for Agent Smith and for the DMA team. Should I send the Ethiopian faces to Agent smith or DMA? The reason I ask this is because DMA has their own facetex.pbo for their african troops. By default I figured I'd send them to Smith, though I don't know how future african faces are going to work, will they all be part of the DMA face tex or will they be part of the main facetex2? Share this post Link to post Share on other sites
sanctuary 19 Posted May 19, 2006 In my opinion it would be better to have a "centralised" source for the .cpp defining the faces, instead of having different people writing different .cpp for their own facesxxx.pbo... with all the possible incompatiblities it could create between each faces addons for the same Llauma's head model. Share this post Link to post Share on other sites
AgentFox2 0 Posted May 19, 2006 I agree with Sanctuary. There needs to be one standardized addon with a large foundation of faces for Llauma's head. I think there also needs to be more scripts in the facetex addon. Right now there's nothing to differentiate west or east or anything else. There needs to be several scripts that randomize between the different "types" of faces, such as camo, white, asian, black, etc. A better script, that allows for custom faces easier would be good also (such as adding a global boolean check in case the mission maker doesn't want random faces). Share this post Link to post Share on other sites
sputnik monroe 102 Posted May 19, 2006 Quote[/b] ]I agree with Sanctuary. There needs to be one standardized addon with a large foundation of faces for Llauma's head.I think there also needs to be more scripts in the facetex addon. Right now there's nothing to differentiate west or east or anything else. There needs to be several scripts that randomize between the different "types" of faces, such as camo, white, asian, black, etc. A better script, that allows for custom faces easier would be good also (such as adding a global boolean check in case the mission maker doesn't want random faces). That has been a reoccuring thought in my mind. Does the facetex script simply draw the faces it uses from one pool? Or can it be set up so that an addon only draws faces from a certain pool for it's troops. Example: a Russian troop pack only uses faces from the pool of Russian faces and a Chad troop pack only draws faces from an African face pack. Share this post Link to post Share on other sites
BlackScorpion 0 Posted May 19, 2006 Well, DMA textures are in one .pbo, and only some of them use the "African" faces, instead of the "Libya Arabic" ones... same with GROM units... so it should be possible to define what faces the unit will use. Unless it's coded into the addon itself, though... Share this post Link to post Share on other sites
ag_smith 0 Posted May 19, 2006 Quote[/b] ]I agree with Sanctuary. There needs to be one standardized addon with a large foundation of faces for Llauma's head.I think there also needs to be more scripts in the facetex addon. Right now there's nothing to differentiate west or east or anything else. There needs to be several scripts that randomize between the different "types" of faces, such as camo, white, asian, black, etc. A better script, that allows for custom faces easier would be good also (such as adding a global boolean check in case the mission maker doesn't want random faces). That has been a reoccuring thought in my mind. Does the facetex script simply draw the faces it uses from one pool? Or can it be set up so that an addon only draws faces from a certain pool for it's troops. Example: a Russian troop pack only uses faces from the pool of Russian faces and a Chad troop pack only draws faces from an African face pack. It's up to our imagination how to write the scripts that are assigning faces. For example, right now addonmakers can make a choice to use camo or non-camo faces (or they can even write a simple script to use a random mix of them). So this is what I'm going to do, I'm gonna make a separate batch script for each face class, eg. camo white, camo hispanic, camo russian, and so on. If one wants to have a mix of these faces in any addon, a script like one below can be used: <table border="0" align="center" width="95%" cellpadding="0" cellspacing="0"><tr><td>Code Sample </td></tr><tr><td id="CODE"> _soldier = _this select 0 _facetype = random(5) ?(_facetype < 1): [_soldier] exec "\facestex2\camoface.sqs" ?(_facetype < 2): [_soldier] exec "\facestex2\baseface.sqs" ?(_facetype < 3): [_soldier] exec "\facestex2\blackface.sqs" ?(_facetype < 5): [_soldier] exec "\facestex2\russianface.sqs" .. or anythinf along those lines. Sounds good enough? Share this post Link to post Share on other sites
CameronMcDonald 146 Posted May 20, 2006 Sounds great, Smith - really good. Can't wait to use these, when the work is finally done. Share this post Link to post Share on other sites
CameronMcDonald 146 Posted May 21, 2006 Just one last thing - can you please give the US script a mix of suitable black and white faces? Just for realism's sake, eh? Share this post Link to post Share on other sites
Bobcatt666 0 Posted May 21, 2006 drawback zero of Lasers of the johndoe based units support any other body tones, the hands and arms look funny being hite, with a black or hispanice or even asian head, like franken hooker. Share this post Link to post Share on other sites
sputnik monroe 102 Posted May 21, 2006 Quote[/b] ]Just one last thing - can you please give the US script a mix of suitable black and white faces? Just for realism's sake, eh? Obviously that will be possible. Asian and Hispanic faces can be included also, (as they are already in). As Bobcat pointed out though, there is the problem of white hands. Share this post Link to post Share on other sites
sanctuary 19 Posted May 21, 2006 A solution used by several addons maker for the arms colors was to make the arm texture sharing the color of a part of the face. This way the arm would always be the same color skin as the face, whatever color the it was (if i remember well, in the sebnam pack you could see some units with arm not covered by their cloth using this technique). I guess, the people using Llauma's head on their model could do the same for the hands to force the color skin to be the same as the one of the face. Another solution would be to give gloves to every of their model Share this post Link to post Share on other sites
sputnik monroe 102 Posted June 2, 2006 I've finished up the Ethiopian faces and sent them along with the Allied caucasian faces to Agent Smith. Â How goes it with the Russian faces Shadow? *Edit* I have updated the progress report in the first post of this thread. The project is %65 complete. Share this post Link to post Share on other sites
ag_smith 0 Posted June 2, 2006 How goes it with the Russian faces Shadow? Already have them. Share this post Link to post Share on other sites
CameronMcDonald 146 Posted June 3, 2006 Yo Sputnik, are the rest of the faces being worked on, or? Share this post Link to post Share on other sites
Shadow NX 1 Posted June 3, 2006 How goes it with the Russian faces Shadow? Already have them. Did you get the ones from the PM with the corrected mouths? Share this post Link to post Share on other sites
ag_smith 0 Posted June 3, 2006 How goes it with the Russian faces Shadow? Already have them. Did you get the ones from the PM with the corrected mouths? Yes, I did. Sorry for no reply. I'll definitely work on this project today and tomorrow. Share this post Link to post Share on other sites
Battling 0 Posted June 5, 2006 dunno if it is the right place but i made a texture try for llaumas heads when i was working on the ww2ec faces for cean 1944 project did a complete new face but see yourself Share this post Link to post Share on other sites