
captainclaw
-
Content Count
33 -
Joined
-
Last visited
-
Medals
Everything posted by captainclaw
-
Animation - explanation of the magic behind
captainclaw replied to smookie's topic in ARMA 3 - ADDONS - CONFIGS & SCRIPTING
Hey guys Wondering if anyone knows how to have it so only one limb is affected by an animation ( like the wave gesture) say, for example, the character lifts his left hand off of the gun and starts to count down with his fingers. I would still want him to be able to walk around, but his gun would be lowered. Do I have to make the animation for each one or is it as simple (or complex) as a config tweak? Thanks guys -
Static Line Parachute Mod
captainclaw replied to deltagamer's topic in ARMA 3 - ADDONS & MODS: COMPLETE
Delta... this mod made my communities 21 hour operation work :D http://i.imgur.com/TPb0gKj.jpg 39 people gracefully floating, straight into a mission that nearly broke my brain Thanks so much for the work you have put into getting this mod to where it is :) -
On screen wind debris Help
captainclaw replied to captainclaw's topic in ARMA 3 - MISSION EDITING & SCRIPTING
wow thank you this is great :D... pretty much exactly what I was looking for -
Hey guys, I've been working on a script for MP that creates a dusty feel to the terrain. I have the color corrections, light fog and even some light film grain effects to get feel for the mission right. However I feel its not quite immersive enough for my liking, and that all it needs is some on screen particle effects so it looks like something is floating past your vision. Not sure how to go about starting this part, nor implementing. Thanks Claw
-
Should have the same effect
-
Okay well afaik the planes won't take off properly without a runway, but I could be wrong. If you want the Ai to stop moving from the start of a mission, there is a module under Object Modifiers >> Set Ai mode >> Move >> Disabled Sync this module to the ai if you want them to stop after a certain trigger just sync the trigger and module together to make something disappear with a trigger, give the unit a name ( like RedCar1) now for example if you want it to disappear after it gets to a certain location, place a trigger and set the size. Then group the trigger to the unit, it should change activation to vehicle, leave it set to present. In the on act type deletevehicle RedCar1 change the name to what you have called the ai ofc
-
just need some extra info from you bud. Which map are you making the mission on? Are you on a runway? what plane are you using? as for the Ai to stop... do you want them to park and hold? Or do you want them to no longer animate for a time?
-
Mulitplayer credits
captainclaw replied to captainclaw's topic in ARMA 3 - MISSION EDITING & SCRIPTING
thanks for the replies guys... going to wait until after the holidays before I give it a test But I'll let you know as soon as i get it working. Happy Holidays Claw -
So I was wondering if anyone would be able to help with this I am trying to write a script that will take the names of the players in a mission, of which numbers and names change. What I have managed to do with some searching around is get my name to appear in the credits (easy part tbh) Here is what I have so far if (isNull player) exitWith {}; _credits = [ [ "", ["Reach","Elite","Forces"] ], [ "Active Members", [_name] ] ]; _layers = ["credits1" call bis_fnc_rscLayer,"credits2" call bis_fnc_rscLayer]; _delay = 5.5; _duration = _delay * 1.5; { _title = [_x,0,""] call bis_fnc_paramin; _names = _x select 1; _text = format ["<t font='PuristaBold'>%1</t>",toUpper (_title)] + "<br />"; { _text = _text + _x + "<br />"; } foreach _names; _text = format ["<t size='0.8'>%1</t>",_text]; _index = _foreachindex % 2; _layer = _layers select _index; [_layer,_text,_index,_duration] spawn { disableserialization; _layer = _this select 0; _text = _this select 1; _index = _this select 2; _duration = _this select 3; _fadeTime = 0.5; _time = time + _duration - _fadeTime; _layer cutrsc ["RscDynamicText","plain"]; _display = uinamespace getvariable ["BIS_dynamicText",displaynull]; _ctrlText = _display displayctrl 9999; _ctrlText ctrlsetstructuredtext parsetext _text; _offsetX = 0.1; _offsetY = 0.3; _posW = 0.4; _posH = ctrltextheight _ctrlText + _offsetY; _pos = [ [safezoneX + _offsetX,safezoneY + _offsetY,_posW,_posH], [safezoneX + safezoneW - _posW - _offsetX,safezoneY + safezoneH - _posH,_posW,_posH] ] select _index; _ctrlText ctrlsetposition _pos; _ctrlText ctrlsetfade 1; _ctrlText ctrlcommit 0; _ctrlText ctrlsetfade 0; _ctrlText ctrlcommit _fadeTime; waituntil {time > _time}; _ctrlText ctrlsetfade 1; _ctrlText ctrlcommit _fadeTime; }; _time = time + _delay; waituntil {time > _time}; } foreach _credits; and what I need is for the Active members part [ "Active Members", [_name] ] to be able to pull all the players online at the time and display them I don't want to give up on the idea just yet so I thought I would ask the more talented scripters :D Thanks Guys Claw
-
Ok the vest is no longer at my Characters feet, but it doesn't appear on the character. When using the example vest model to check if it was my config or model I can see shadows but no actual vest :( http://cloud-4.steampowered.com/ugc/537375683737891063/EF514B01D67DDAF106D011BEC80C63B684A11ECD/ (114 kB)
-
Okay now I know that this gets asked a lot, and I have searched and went through as many of the thread about this topic as I could find. So here is my issue I have created a vest, followed all of the tutorials and tips I can find, and still my vest is on the ground. So I went one further and used the example vests to see if I could get them into the game, with the example model.cfg and still its at the characters feet. Here is what I'm working with Config.cpp enum { // = 2, // Error parsing: Empty enum name DESTRUCTENGINE = 2, DESTRUCTDEFAULT = 6, DESTRUCTWRECK = 7, DESTRUCTTREE = 3, DESTRUCTTENT = 4, STABILIZEDINAXISX = 1, STABILIZEDINAXESXYZ = 4, STABILIZEDINAXISY = 2, STABILIZEDINAXESBOTH = 3, DESTRUCTNO = 0, STABILIZEDINAXESNONE = 0, DESTRUCTMAN = 5, DESTRUCTBUILDING = 1, }; class CfgPatches { class Reach_Vest { units[] = {}; weapons[] = {"V_Reach_New_Vest"}; requiredVersion = 0.1; requiredAddons[] = {"A3_Characters_F_BLUFOR"}; }; }; class cfgWeapons { class V_PlateCarrier1_rgr; class VestItem; class ItemInfo; class ItemCore; class HeadgearItem; class H_Cap_Red; class Uniform_Base; class UniformItem; //Vests class V_Reach_New_Vest: V_PlateCarrier1_rgr{ displayName = "Reach Tactical Vest"; model = "\ReachVest1\data\RMP_vest.p3d"; class ItemInfo: ItemInfo { uniformModel = "\ReachVest1\data\RMP_vest.p3d"; }; }; }; and my model.cfg class CfgSkeletons { class Default { isDiscrete = 1; skeletonInherit = ""; skeletonBones[] = {}; }; class OFP2_ManSkeleton { isDiscrete = 0; skeletonInherit = ""; skeletonBones[] = { "Pelvis","", "Spine","Pelvis", "Spine1","Spine", "Spine2","Spine1", "Spine3","Spine2", "Camera","Pelvis", "weapon","Spine1", "launcher","Spine1", //Head skeleton in hierarchy "neck","Spine3", "neck1","neck", "head","neck1", //New facial features "Face_Hub","head", "Face_Jawbone","Face_Hub", "Face_Jowl","Face_Jawbone", "Face_chopRight","Face_Jawbone", "Face_chopLeft","Face_Jawbone", "Face_LipLowerMiddle","Face_Jawbone", "Face_LipLowerLeft","Face_Jawbone", "Face_LipLowerRight","Face_Jawbone", "Face_Chin","Face_Jawbone", "Face_Tongue","Face_Jawbone", "Face_CornerRight","Face_Hub", "Face_CheekSideRight","Face_CornerRight", "Face_CornerLeft","Face_Hub", "Face_CheekSideLeft","Face_CornerLeft", "Face_CheekFrontRight","Face_Hub", "Face_CheekFrontLeft","Face_Hub", "Face_CheekUpperRight","Face_Hub", "Face_CheekUpperLeft","Face_Hub", "Face_LipUpperMiddle","Face_Hub", "Face_LipUpperRight","Face_Hub", "Face_LipUpperLeft","Face_Hub", "Face_NostrilRight","Face_Hub", "Face_NostrilLeft","Face_Hub", "Face_Forehead","Face_Hub", "Face_BrowFrontRight","Face_Forehead", "Face_BrowFrontLeft","Face_Forehead", "Face_BrowMiddle","Face_Forehead", "Face_BrowSideRight","Face_Forehead", "Face_BrowSideLeft","Face_Forehead", "Face_Eyelids","Face_Hub", "Face_EyelidUpperRight","Face_Hub", "Face_EyelidUpperLeft","Face_Hub", "Face_EyelidLowerRight","Face_Hub", "Face_EyelidLowerLeft","Face_Hub", "EyeLeft","Face_Hub", "EyeRight","Face_Hub", //Left upper side "LeftShoulder","Spine3", "LeftArm","LeftShoulder", "LeftArmRoll","LeftArm", "LeftForeArm","LeftArmRoll", "LeftForeArmRoll","LeftForeArm", "LeftHand","LeftForeArmRoll", "LeftHandRing","LeftHand", "LeftHandRing1","LeftHandRing", "LeftHandRing2","LeftHandRing1", "LeftHandRing3","LeftHandRing2", "LeftHandPinky1","LeftHandRing", "LeftHandPinky2","LeftHandPinky1", "LeftHandPinky3","LeftHandPinky2", "LeftHandMiddle1","LeftHand", "LeftHandMiddle2","LeftHandMiddle1", "LeftHandMiddle3","LeftHandMiddle2", "LeftHandIndex1","LeftHand", "LeftHandIndex2","LeftHandIndex1", "LeftHandIndex3","LeftHandIndex2", "LeftHandThumb1","LeftHand", "LeftHandThumb2","LeftHandThumb1", "LeftHandThumb3","LeftHandThumb2", //Right upper side "RightShoulder","Spine3", "RightArm","RightShoulder", "RightArmRoll","RightArm", "RightForeArm","RightArmRoll", "RightForeArmRoll","RightForeArm", "RightHand","RightForeArmRoll", "RightHandRing","RightHand", "RightHandRing1","RightHandRing", "RightHandRing2","RightHandRing1", "RightHandRing3","RightHandRing2", "RightHandPinky1","RightHandRing", "RightHandPinky2","RightHandPinky1", "RightHandPinky3","RightHandPinky2", "RightHandMiddle1","RightHand", "RightHandMiddle2","RightHandMiddle1", "RightHandMiddle3","RightHandMiddle2", "RightHandIndex1","RightHand", "RightHandIndex2","RightHandIndex1", "RightHandIndex3","RightHandIndex2", "RightHandThumb1","RightHand", "RightHandThumb2","RightHandThumb1", "RightHandThumb3","RightHandThumb2", //Left lower side "LeftUpLeg","Pelvis", "LeftUpLegRoll","LeftUpLeg", "LeftLeg","LeftUpLegRoll", "LeftLegRoll","LeftLeg", "LeftFoot","LeftLegRoll", "LeftToeBase","LeftFoot", //Right lower side "RightUpLeg","Pelvis", "RightUpLegRoll","RightUpLeg", "RightLeg","RightUpLegRoll", "RightLegRoll","RightLeg", "RightFoot","RightLegRoll", "RightToeBase","RightFoot" }; // location of pivot points (local axes) for hierarchical animation pivotsModel="A3\anims_f\data\skeleton\SkeletonPivots.p3d"; }; }; class CfgModels { class Default { sectionsInherit=""; sections[] = {}; skeletonName = ""; }; class ArmaMan : Default { htMin = 60; // Minimum half-cooling time (in seconds) htMax = 1800; // Maximum half-cooling time (in seconds) afMax = 30; // Maximum temperature in case the model is alive (in celsius) mfMax = 0; // Maximum temperature when the model is moving (in celsius) mFact = 1; // Metabolism factor - number from interval <0, 1> (0 - metabolism has no influence, 1 - metabolism has full influence (no other temperature source will be considered)). tBody = 37; // Metabolism temperature of the model (in celsius) sections[] = { "osobnost","Head_Injury","Body_Injury","l_leg_injury","l_arm_injury","r_arm_injury","r_leg_injury","injury_body", "injury_legs", "injury_hands", "clan","clan_sign","Camo","CamoB","Camo1","Camo2","personality","hl", "injury_head" }; skeletonName = "OFP2_ManSkeleton"; }; Class RMP_Vest : ArmaMan { }; }; any help would be appreciated side note, autocenter is set to 0
-
I have started to work on a simple mod that adds the players insignia based on the profile name. For example My name is Sgt.|Claw and one of the other members of my community is Sfc.|Setkiro the mod the works out, from the | character, that my rank is Sgt. and his is Sfc. and it returns with http://cloud-4.steampowered.com/ugc/567772240399299299/3EDF358348964D57D6574754E45F5BB161F362C9/ (248 kB) When you change uniform or respawn, to re add the image all you have to do is open and close your inventory. It works with every uniform that can handle insignia's For the most part I was making this mod for my community, however if there is enough interest I will release it here aswell Claw
-
Insignia set by Profile name Rank
captainclaw replied to captainclaw's topic in ARMA 3 - ADDONS & MODS: DISCUSSION
depending on how many people you would need it for it would easily be achievable, rather than an array character search you could just do a switch case that goes through the PID and adds the name respectively -
It is posible make an addon for disable the GPS (minimap)?
captainclaw replied to legolasindar's topic in ARMA 3 - ADDONS - CONFIGS & SCRIPTING
I think it would be as simple as making a function that starts on mission start, and that uses the code Player removeItem "Gps"; I will pm you an idea of what to do Claw -
Reach Elite Forces MRAP Cougar 4x4 WIP
captainclaw replied to publicfunction's topic in ARMA 3 - ADDONS & MODS: DISCUSSION
it is definitely something we could look into. Once we get the base model for this variant done with, other models probably will come. At the moment we just need to get Pubs (Main developer and modeler) Autumn (Graphics) and myself (Coder) into a session to fine tune the driving and textures, we'll add an armed version. If all goes to plan we will launch the alpha version to our community mid September (1st year birthday of the community) and let them play around with it for a bit, then we'll publicly release here shortly after that. -
Reach Elite Forces MRAP Cougar 4x4 WIP
captainclaw replied to publicfunction's topic in ARMA 3 - ADDONS & MODS: DISCUSSION
Hey guys, sorry for not posting anything for a while, we've had some solid work on other projects at Reach to deal with.... however I do have a sneaky screen grab from public to show you https://dl.dropboxusercontent.com/u/3812831/ref/MRAP%20Cougar%204x4/skin_test1.jpg (419 kB) Just a little teaser while we have our texture guy fine tune everything -
Reach Elite Forces MRAP Cougar 4x4 WIP
captainclaw replied to publicfunction's topic in ARMA 3 - ADDONS & MODS: DISCUSSION
sorry for the late reply surpher public and myself were taking a small night off... will let you know how your changes go once we get it all packed up. And thanks for the help :D Once again you come to the rescue of our community -
Hey guys me and a buddy of mine in my community are at a loss and were wondering if anyone could give us a hand. So we have been building an MRAP for and we have it in the game, driving and we can interact with it. our issue at the moment is the vehicle seems to be colliding with or under the ground here is a video to better describe the problem if you need to see anything to help us with this just ask and we will arrange something
-
Ok so my sin pack for my clan is almost done We have 6 Uniform classes about 20 Headgears 2 Vests So here is where I need help 1) How do you change the uniform type (Sleeves Down, Rolled up, T-shirt) 2) Remove American Flag (I know its to do with the RVMAT but I can't seem to get it to read the new one giving me an error) 3) Reskin Backpacks (Can't find the config for this anywhere) Here is my code so far if you require to see it Thanks in advance If you know how to help but need help with something I have working that you don't you can always ask :) CC
-
BinPBO config.bin problem
captainclaw replied to BadHabitz's topic in ARMA 3 - ADDONS - CONFIGS & SCRIPTING
From what I have seen it places some items in the relevant area, my uniforms all go to the bottom as do headgear and vests however the backpacks go in the same section as the original. Looking over your code it is almost the exact same as mine so I have no idea as to why your items would not be at the bottom -
Error when trying to retexture a unit
captainclaw replied to PHAL13's topic in ARMA 3 - ADDONS - CONFIGS & SCRIPTING
to something like -
So the skins are working now :) however it still comes up with an error for saying it can't load the rvmat.... Is this the issue with BinPBO and if so how do you add it to the ignore list After asking the members of the community they are happy to play with the error message however it just feels unfinished to have it in there when I know we shouldn't
-
Thank you both, I will try these out when I get home from work :)
-
Hey man.... love everything you have done here its just awsome.... I was wondering if anyone had figured out a way to get a map with unit markers on the screen working... its something I would love in my missions that I put out for my clan Thanks CC
-
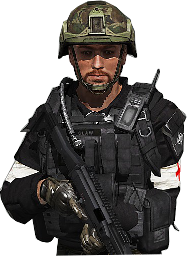
How does the skining system work in Arma 3? Can we have arm patch logos?
captainclaw replied to kingsaces's topic in ARMA 3 - QUESTIONS & ANSWERS
ATM the only way to do this is to reskin the units already in Arma... I have been doing it since I got mine working a few days ago for my community as it makes us look Awsome... the thread that really helped me was http://forums.bistudio.com/showthread.php?148130-Arma3-Characters-Modding-Tutorial If you get stuck PM me :)