

bushlurker
-
Content Count
2167 -
Joined
-
Last visited
-
Medals
-
Medals
-


Posts posted by bushlurker
-
-
If you're using Keypoints on your map to designate place names then you'll know that TB saves these out as a file in your Main Project Directory, eg "nameofproject.hpp"
If you load this file into Notepad you can then edit the place names to use your odd characters, then - as you go to resave the file - look for a popdown menu on the save dialog called "Encoding". It'll probably be set to ANSI by default.
Change that to UTF-8 and then save the file as normal
That - should - allow "special characters" like accents above letters, etc to show in-game
Whether it'll work for actual foreign characters, I'm not entirely sure, but it's worth a try...
NB - REMEMBER!! - TB (Re)creates that NameOfProject.hpp file every time you save, or export .wrp or something like that, so remember that it may get overwritten automatically by TB at a later stage
B
-
 2
2
-
-
AddonBuilder works just fine guys, never had any problems with it.With terrains it's notoriously dodgy... One of its main dodginesses being - it doesn't report problems when it encounters them, which may be why you haven't been encountering any problems with it... ;)
B
-
Whatever you do, DON'T blur your mask - that'll just create more colours at the borders between colours...
Counting colours, on the other hand, is a Good Idea - when there's too many colours within a given area, the standard symptom is usually one ground texture overlaid/blended with another.
You can also use Photoshops "indexed colour" mode to enforce a palette of only 6 colours...
B
-
1
-
-
Hi guys...
Yes - BI did indeed "semi-fix" the Outside Terrain tech, though since CUP reputedly switches that off anyway then it shouldn't matter, since you'll need AiA, or MUCH better still, CUP in order to run these old Arma 2 terrains...
I've tried the standard A2 Carraigdubh in A3 with CUP and it seems to work fine for me with no errors
Not sure what combination of "BI Semi-Fixed Outside terrain" and "CUP switching it off" is going on there - the Outside terrain starts just where that road ends and as you can see, seems to be a series of widely spaced low ridges with pretty flat areas in between, rather than the nice gently rolling hills we got in Arma 2... However - it's working - glitch free for me...
Of MUCH more importance is the fact that there's a small pond up at the top left quadrant of the map - this WILL cause issues and would need to be disabled/removed or there's going to be visual glitches - or worse - over in that quadrant...
(Actually, I thought CUP "removed" pond objects too???)
Anyhow - until such times as I can - finally - get around to providing a proper Arma 3 version of this terrain, everyone has my Full Permission to mess with Outside terrain, Ponds or any other tweaks you find necessary to get this terrain working for your personal/team/group/clan use in Arma 3 - glad to see people still keen to have fun on what's really a pretty sparse little map... (it's the hedges, isn't it...? ;)
Have fun!
B
-
1
-
-
It's unusual that cluttercutter isn't suppressing this maverick clutter.. :( - that would've been a quick, if unsatisfying fix...
Still - I have one - slightly longshot - suggestion you could try, but first - a question...
In your mapframe properties panel "Sampler" tab - where you set the resolution for your Mask, Sat, etc - are you importing one size of mask file, but then using a different final mask size in the actual sampler properties...
ie: something like - your imported satellite image is actually 20480x20480, but for one reason or another you have your Sampler settings for Mask & sat to be 10240x10240... that sort of thing...
In a situation like that, as TB creates the Layers tiles - it's basically "resizing/resampling" as it goes, and just like in Photoshop, occasionally a sort of colour clash effect can occur on the borders between certain colours...
It's very important to remember right here that TB doesn't really care what actual colours you use on your mask - as it creates each tile it looks the colour you used up in Layers.cfg - fetches the appropriate surface info for that colour - then it colours that pixel on the mask tile it's creating - BUT - IT DOESN'T USE YOUR COLOUR... If you look at the final Mask tiles TB creates in "Layers" folder, you'll see it uses RGBY and two other "shadings" for colours 5 and 6... It reassigns it's own colours using this palette combined with your mask info
Moreover - it starts afresh as it moves on to each new tile, so Red might be used by TB in one tile for "Green Grass" and in the adjacent tile, Green Grass is "Blue" and "rock" is Red or something.
Combine this with the potential for "colour dithering" at unspecified colour borders - which will vary from tile to tile, and somewhere in there - could - be an answer for you...
I would.....
Firstly - check to make sure you're not doing that "letting TB resize/resample" thing with your mask... It's always best to import the initial datafiles (heightmap, mask, sat, normals if used) in the actual res you intend to use them in - that avoids TB potentially doing a messy resample...
Secondly - Take a look at your "Layers.cfg" file - Down at the bottom is where you list all your surfaces (which you defined above) one after the other and associate them with YOUR mask colours..
TB uses this as a lookup table - literally - reading the Colors list from top down as it searches to identify each pixel it encounters on your mask...
Try changing the order in which the surfaces are listed... If you can identify the surface/s where the maverick clutter appears - move them to different positions relative to each other in that list, so they'll be "encountered" sooner or later... It might just shift the problem elsewhere, if all of this IS what's actually happening...
I've seen this sort of problem in VBS with the early VBS terrain tools, and since TB is basically a "long-ago branched from the VBS original" version of those tools, it's possible the same thing can occasionally happen in Arma... It's a pretty straightforward fix to try - check sampler tab settings - adjust the Colors table item order - recreate layers folder, re-export wrp - pack and take a look....
B
-
It's a very big terrain, with a large "heightmap cell size"... The Heightmap tools can only be as precise as the heightmap resolution you've chosen, so what you're seeing is 20 meter spacing...
Looking at your settings pic , the Satellite/mask imagery setting is horrifically low - that's going to look pretty terrible in-game, and the mask tiles & texture layer sizees are pretty low too....
Your main issue - the heightmap ground resolution, CAN be changed a little, to give you finer detail there...
In your mapframe properties "Sampler Tab" - top left, try...
Grid size 4096x4096
Cell size 10m
You'll notice that gives you a terrain of the exact same physical size in meters - 40960x40960 meters - but instead of 20 meter "cells" you have 10 meter - MUCH better.
Sadly, with a terrain of this size, that's about as low as you can go... TB DOES offer a 8192x8192 grid size, but it's.... problematic and best avoided...
Moving down on that same properties page, your satellite/mask imagery is currently 2048x2048 pixels - that means that each pixel of that satellite image is being stretched to cover a 20x20m ground area... that's going to look horrible....
You need that to be 20480x20480 @ 2 meters per pixel as an absolute minimum, and even then it'll look quite "blocky"... Ideally you want 1 meter per pixel for Sat & Mask imagery, but since your map is 40960x40960 meters, that would mean a 40960x40960 pixel image - which is kinda beyond both Photoshop and the required formats (png, bmp, etc) capability.
To do 1m/pixel properly you'd need to use 4 x 20480x20480 images, and arrange them in a 2x2 grid in TB... ,Definitely possible, but tricky to do...
and finally, below those settings, the "Satellite/Surface Mask tiles setting - you have 256x256 currently - you'll need 512x512 in there once you start increasing the res in the other areas, and the bottom setting, "Texture Layer size" should be about 40m x 40m...
A map this size is a Monumental Undertaking, even if you're aiming for a largely "flyboys" level of detail, and its a very big and unwieldy size for a "first terrain"... are you absolutely sure you want to wade into something this big right away? It's often a good idea to do a little map first, go through all the stages, make all the mistakes, ask all the questions, start to grasp the concepts and get a little, but fully working, completed result under your belt... That's going to give you some valuable experience and, more importantly, confidence. Since it's a little terrain, all those stages don't take so long, and it gets all the beginners level problems like yours out of the way, so that when you tackle that Big Project, your only issue is that its a Big Project, you're not struggling with beginners issues AND a gigantomap at the same time....
Whatever you decide, the settings I posted above should get your Big Project slightly more reasonably configured, and the ground editing will show 4 cells in a 2x2 grid where you only had one before - that'll allow some higher-res ground editing at least....
Good Luck
B
-
You could also do this which is working for me. I just call the classes I need from altis. I think this way is a bit better...someone correct me If I'm wrong but the way it is above you will be overwriting a base class. The way this is set up you are just inheriting from it.This is exactly how it works in VBS - A selection of surface definitions are in there and "always present" since they're part of the core definitions, so your own surfaces just declare themselves to be a "child" of the "stock" ground surface which is nearest to the one you're using. Then, any aspects of your surface which differ from the stock one can be specified below... If you specify a unique parameter for your surface, you get that value - anything you don't specify, you get the value used by the stock surface.
Makes it relatively quick and easy to define your own surfaces without having to declare every single parameter for every single surface... Like - if you have a custom concrete, but it will behave like stock concrete, same footstep sounds, impact sounds, dust factor etc, only the appearance is different, you can inherit from the stock concrete - specify your texture files as the only parameter and you're done - you'll get your concrete visual appearance, and stock concrete behaviour....
B
-
Jimbop's right on the money...
Your cfgSurfaces looks fine - everything is where it should be, the concrete texture clearly has no surface character clutter assigned. You shouldn't be getting clutter on "Concrete2".. Even more suspicious is the fact that other areas of concrete are all ok - it's only this one area which is affected.
By far the most obvious cause of that is stray pixels of another colour in among the concrete in this specific area.
It should definitely be your first task to totally micro-check that mask area at high zoom - even a few pixels of an inappropriate colour are enough...
Another way of visual checking would be to switch off objects view and check out the area in buldozer.... you don't see clutter in BD anyway of course, but you should be able to see the occasional small patch of "Pebble" or whatever the clutter is assigned to in among the areas of Concrete2 if they exist...
Thats the first thing I'd check... Can't think of another reason offhand which could cause this effect,,,
B
-
If you choose to use a "Normals Layer" along with your Satellite and Mask layers, then that "uses up a texture slot in the pixelshader", and you can only have 5 colours at once. If you don't bother with a Normals layer - and a lot of people don't - then you can have up to 6 colours.
A "Normals Layer" is relatively new tech - they didn't exist in Arma 2 maps, and the tech is borrowed from the Take On Helicopters series... It's perhaps best thought of as a way of adding some additional overall detail to your satellite imagery layer at longer ranges and is probably best suited to larger, aircraft-orientated maps (Like Take On Helicopters ones, in fact ;) ), for smaller mixed-use maps, most terrain guys prefer to have that extra sixth ground surface capability instead, and skip the normals layer.
So, in practise, you decide whether you're going to use a Normals layer or not, and, in the Mapframe Properties Processing tab, when you go to generate your layers, either check the "5 colours plus normals" box, or the "six colours" box as appropriate...
B
-
1
-
-
Hi again...
Well done! That all looks much neater!
Lets look at all three of your files in turn and see what we can spot...
Firstly - cfgClutter...
This is great - you've got one clutter item correctly defined and it's classname is "bih_GrassGreenGroup" - you'll need to remember that name later when you want to call on this model as part of a "surface Character" or "ClutterMix"
On to cfgSurfaces...
The top "surfaces section" is fine. Adding that "_Surface" suffix to the end of the classname is a great idea - it labels the class clearly as a surface definition and it allows you to use the same name - without the "_Surface" part - in your layers.cfg classes. That makes it easy to check you're being consistent in both files.
In one of your classes you've correctly referenced a "surface character", or "clutterMix" - character = "bih_grass_green_Character"; - and down below in the Surface Characters section is where that cluttermix should be defined... It's there, where it should be, and it's mostly OK, but lets take a closer look at it...
class CfgSurfaceCharacters
{
class bih_grass_green_Character
{
probability[] = {0.92,0.07};
names[]={"bih_gass_green"};
};
};The classname is fine - it corresponds to the definition you made above, so this is the surface character definition which wil be used for that surface... but...
in the "probability=" line there's TWO numbers - there should be one number here for each clutter item named below, and since you only have one item named below, there should only be one number... maximum of 0.99...
Worse still is the item mentioned in the "names=~" section... each name in here should be the classname of one of your cfgClutter definitions... you can have as many different clutter items piled on to a surface as you want, separated by commas, with each having a "percentage" specified by the probability number above, but the "name" MUST be one of the previously defined cfgClutter classnames... You've got your only clutter item defined as "bih_GrassGreenGroup", so that's the name which has to go here.
Finally - Layers.cfg
This also looks fine - 5 texture types specified - the paths to the materials in lowercase - great... Sometimes lowercase in a path doesn't matter, sometimes it definitely does, like here in Layers.cfg, so I usually try to make a habit of always using lowercase in all paths everywhere - even if the folders themselves actually have names with caps, the paths will still work, and that way you never get caught out...
picture="cluster\zd1\sourcemapLegend.png";
There's a "\" missing from this path.... ;)
Otherwise, Layers.cfg looks fine...
Tweak those few problems and give things another go - regenerate layers, re-export .wrp and repack - get it in game and see if you have grass...
B
-
Firstly - you have seven ground surfaces defined in cfgSurfaces - and seven matching surface types in layers.cfg - thats good, and correct...
But - at the bottom of layers.cfg you only have 5 surface colours specified.... you're missing two - there needs to be 7 in all three of these areas
Secondly and more importantly on the clutter front...
material = "CLUSTER\ZD1\data\bih_grass_green.rvmat";Remove all CAPITALS from ALL of these "material=" paths in layers.cfg - lowercase\all\the\way
B
-
changing the cell size to like 1 makes my map very small(like 4 square km instead of 400 square km).Heightmap cell size is nothing to do with satellite or mask layer resolution...
If you make a 1024x1024 terrain with 10 meter cells you get a 10240 meter x 10240 meter terrain (10x10km)
If you make a 1024x1024 terrain with 1 meter cells you get a 1024 meter x 1024 meter terrain (1x1km)
Thats how you control the actual map/terrain size - by picking the best combination of "grid size" - 512x512, 1024x1024, 2048x2048, 4096x4096, etc - and cell size - 4m per cell, 5 meters per cell, 10 meters per cell, etc..
You juggle these two parameters until you have a terrain of roughly the overall size you want, at the overall GROUND resolution you want.. But changing these numbers does nothing to the resolution of the satellite imagery, which is a different set of parameters entirely...
"Draped" over the top of that heightmap grid go the satellite and mask layers - these two imagery layers should match each other in resolution for best results, but aren't tied to those above HEIGHTMAP sizes...
For example, if I made a 2048x2048 grid heightmap with each cell representing 4 meters, then my final terrain size will be 8192 meters wide.
If I use an 8192 x 8192 PIXEL satellite and mask image, then each pixel will appear to cover 1m x 1m on the ground... "1 meter per pixel"" - (that's considered "normal/good" resolution for a sat/mask pair)
If I used a 2048x2048 PIXEL image, then each pixel of that image would be stretched to cover 4m x 4m of ground - "4 meters per pixel"... it would look much blockier and crude
If I used a 16384 x 16384 PIXEL image, then each pixel of that image would only be stretched to cover 0.5m x 0.5m of ground - "0.5 meters per pixel" - That would be considered pretty Super-Hi res for a sat and mask pair...
In general, 1 meter per pixel is considered to be more than adequate and it's what most people use....
So basically... Juggle heightmap grid size and heightmap cell size until you get the actual physical size of terrain you want.
Do the maths.... Grid size x Cell size = physical size of terrain in METERS... (eg: 10240 meters)
Then make Mask & Sat imagery of that same number, but in PIXELS... (eg: 10240 PIXELS)
That will get you 1 meter per pixel imagery, which is what you want to aim for...
B
-
1
-
-
For best results with L3DT you really need to spend a little time developing your own materials...
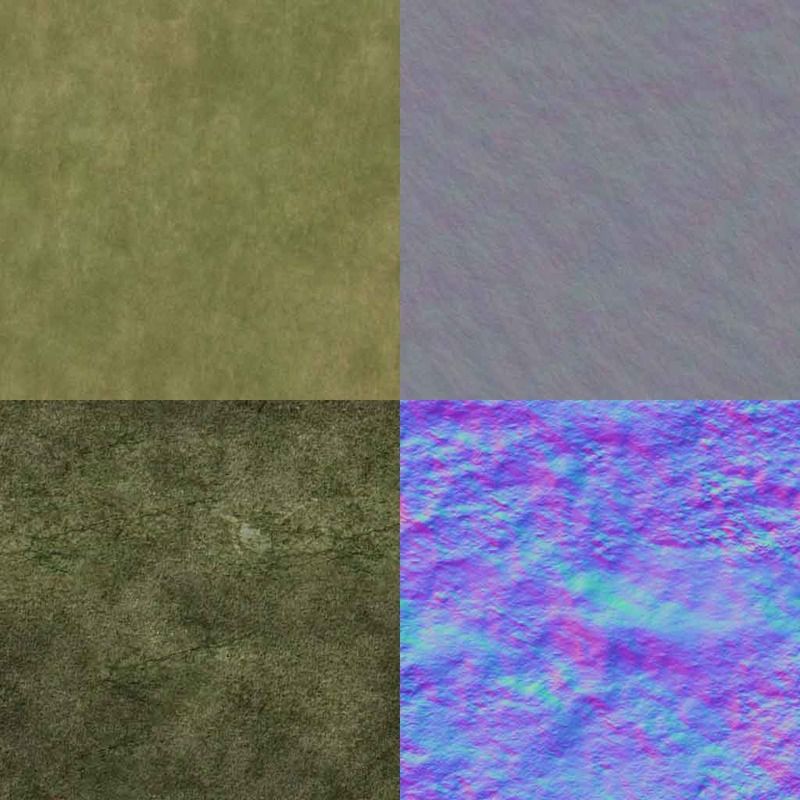
Above = stock L3DT texture & bumpmap, below = custom material
The stock materials are fairly.... bland, but with a bit of effort making custom ones you can squeeze pretty good results out of L3DT.
Main thing to remember when making these textures is that you're not making "ground textures" - its not "the ground as seen from head height looking down", you want to try and imitate "the ground as seen from around 100 meters height" (which works out about 1pixel/meter)
B
-
2
-
-
You should check out L3DT http://www.bundysoft.com/docs/doku.php?id=l3dt:about
There's a free version which is fully functional forever, but limited to 2048x2048 max heightmap and 4096x4096 imagery. The full version is about $34 and can handle heightmaps bigger than you'll ever need, but more importantly can generate imagery up to at least 20480x20480 and well beyond if your computer has the memory, etc
L3DT can generate heightmaps from scratch, and it has a full 3D view heightmap editing feature with all sorts of sculpting brushes, but one of its most powerful features is that it can analyse a heightmap that you load in, decide what sort of surfaces would go where... sand/beach, nice grass, slope areas, steep cliffs, etc - it will then generate images based on that which can be exported and used directly in TB as basic matching mask and satellite imagery...It's very popular with terrain guys who are making fictional places since then you can't just go and download the imagery like you would with a real place, you'd need to paint the mask and sat images manually - L3DT does it for you
The best news is that you can get a download link and a free 90 day key of the full unrestricted edition as a demo - just fill out the form on the website and you should get a key and a download link in the mail, and then you have a free 3 months to figure it out ;)
These terrains
https://forums.bistudio.com/topic/152836-bushs-strange-new-worlds/
have entirely L3DT generated satellite textures, as do a whole bunch of other terrains which have been released - usually, if its a fictional place, it's an L3DT satellite layer being used...
All you'd need to do is to "Export mapframe heightfield" which will get you an .asc file to load into L3DT - you can then analyse that and generate appropriate resolution mask and satellite imagery, export those images and load them into TB and they'll match your heightmap perfectly...
B
-
Ritchie's right - the mask surfaces either have clutter assigned or they don't, and the usual best way to stop clutter poking up through models is to have the ground at that point assigned to a non-clutter surface - like the "general urban gravel" sortof surfaces you'll often see used as an "underlay" underneath roads, buildings, etc.
However, this technique can only be as high-precision as the mask resolution itself, so sometimes it's difficult to achieve a small, neat result.
In these instances, what you need is a "Clutter Cutter".
These are basically invisible, untextured flat-plane objects which suppress clutter on otherwise normally cluttered surfaces...
There's a couple included in the OA models, eg:
"CA\misc_e\clutterCutter_small_EP1.p3d"
Since those models are available as MLODS you can cop one, open it up in O2 (or whatever they're calling it nowadays) and take a look/edit/resize it to suit your needs...
They work nicely and can be extremely handy for spot-area clutter suppression...
The "invisible roads" models do the same thing, though they also carry info which declares them to the AI as "roads" which can occasionally cause unpredictable behaviour depending on the context they're used in (invisible road tiles are ideal for a runway underlay, for example). A Clutter Cutter is the basically same thing, without the Roadway LOD.
B
-
Your screenshot is actually a classic illustration of how the various ground texture layers work in the Arma engine...
Directly under the players feet are the ground textures themselves - tiled on a 1 > 2m grid, with or without associated clutter, and with the _nohq, or _nopx bumpmapping...
As you look gradually further from the player, the same main ground texture tiles are shown in an increasingly lower level of detail, out to the maximum range you specify (or inherit) in your main terrain config.
Beyond that point, you see the basic satellite image itself.
As an additional helper, to smooth the trainsition from the ground textures area to the plain satellite image area, there's a sort of "transitional zone" where the furthest ground textures area (basically just a no-detail ground texture matching tint by that stage) and the nearest plain satellite imagery are "overlaid" with a special extra "detail texture" called the "middle_mco"... this is a special texture file which adds detail only (no actual colour or tint) and it's tiled according to the "Texture Layer Size" you set in your TB Sampler Tab settings... ie: its a small tile, like the ground textures, but stretched to cover about a 30-40m area...
Beyond that, as I mentioned before, is your actual Satellite Image itself...
If there's a distinct difference in the overall tone/tint/colour between the close up ground texture tile and the satellite image, you get the effect in your screenshot...
You have two choices...
Retint the satellite image in photoshop or something until it matches the overall colour/tint of the groundtexture, or...
Retint the ground texture in photoshop or something until it matches the overall colour tint of the satellite image..
(You only need to mess with the "visible" ground texture file, the "_co", in photoshop. Technically, you're also on the right track with the .rvmat, there ARE RGB parameters in there you could mess around with which will also affect the overall tint of a groundtexture... personally I always find just messing with the _co texture file easier, but rvmat retinting IS a viable option if you prefer to try that)
* In all cases, of course, back up your original file before messing with recolouring, so you can "return to zero" if it all goes horribly wrong... ;)
So - pick which one is closest to the actual look you're trying to achieve, and recolour the other to match... If you're careful, then after a little trial-and-error and experimenting you should be able to achieve a pretty seamless result...
B
-
1
-
-
Basically you have two choices - edit the plants pack, or provide the CA (Arma 2) content it's looking for, in the place it expects... Both options are a little tricky but perfectly possible if you're careful (always make backups). Checking thru the forum threads here for people doing or discussing similar things is a Very Good Idea too - this level of tinkering around isn't exactly beginners stuff...
For either approach you'd first need a proper P:\CA folder with the Arma 2 content...
Once you have that, if you wanted to edit the plants pack you'd...
Ask whoever the author of the plants pack is if it's OK to do so, then...
Create a new folder somewhere on P:\ for the new plants pack... If it's going to be associated with your terrain, then right beside your terrain and similarly named might be a good idea
like, your terrain is P:\MyTag\My_New_Terrain
then you could use P:\MyTag\My_New_Terrain_Objects\winterplants\
... for the location.
Then you copy all the winter plant models .p3d's to that folder - just the model .p3d's themselves.
Then you need to get, install and read the read me for Mikero's "MoveFolder" tool.
You can point that to that new models folder and run it and it will read all the paths in every one of the models, follow those paths (even if they lead to the P:\CA folder - which is why you need one), and fetch every texture and rvmat those plants will use, then it will create a \Data subdirectory in your new models folder, copy all the files there, then repath every path in both the models and the rvmats to point to that new "local Data" folder
End result is a self contained plants pack which contains all the models, plus all their textures, all repathed to suit that new location..
The second option is to use AllInArma, or it's successor, the Community Upgrade Project mods
AiA has stopped development, though it's 90%+ working where it matters, and CUP is picking up where AiA left off and is still WIP
Basically, both of these mods effectively add ALL Arma 2 content to the main Arma 3 game... If that mod is running, Arma 3 HAS a "CA" folder...
So you would just carry on using your current plants pack as it is... For TB and buldozer viewing, those pesky missing CA textures would be made available - because you added a proper CA folder to your P:\ drive
And, in game, there'd be no errors either, because when the plants went looking for their Arma 2 textures in Arma 3, AllInArma, or CUP would be there, ready to provide them.
This approach would make AiA (or CUP) a "required addon" for your terrain, people would have to have that mod and be running it in order to use your terrain..
That's not quite as horrific as it sounds - AiA was/is pretty popular, and a lot of people will have it already, and secondly, since it basically provides ALL Arma 2 content within Arma 3, you're free to use any and all of the CA (Arma2) content which you have on P:\ on your terrain....
For that reason, an AiA dependency is is something quite a few recent terrain guys have chosen to use...
B
-
Sounds like you've picked a tricky addon to work with...
To start with, "CA" is the "P:\drive prefix" for the Arma 2 game content.
Just like you have a P:\A3\ folder, with basically the whole of Arma 3 unpacked and arranged properly in the correct folder structure, back in the Arma 2 days, modders had the same thing, except it was called P:\CA
Your models sound like a typical "minimal" retexture from Arma 2.
At a guess, I'd say what's been done is that the required models have been placed in a P:\plants_winter folder - almost certainly with a \Data\ subfolder for textures. Then, the required "visible to the player" original plant textures have been copied over to this new Data folder, and then retextured to look "wintery". Then, the models in P:\plants_winter had the paths to those visible textures redirected to this local \Data\subfolder, so they'd use the wintery textures instead of the stock Arma 2 ones and the player would see - winter plants.
However, plants and veg have complicated textures which involve bumpmap and "mc" materials (textures), and also .rvmat files to control how all these textures are applied... There are paths to ALL of these files inside the model.p3d itself.
Since it's not necessary to change any of that other stuff in order to make a plant look "wintery" there's really no need to change those other paths, this is an Arma 2 addon, being used in Arma 2, so those CA\Plants2\wherever\ textures will ALWAYS be there, since they're part of Arma 2 itself.
Except now they're in Arma 3 and there is no CA - no Arma 2 content... so those textures can't be found...
Without looking at the structure of the addon itself and checking all the paths to stuff I can't say for sure that's your particular issue, but in general, anything looking for CA\Anything is from Arma 2, and still wants to be in Arma 2...
B
-
The first thing you have to realise with all Arma models is that they contain Hardcoded Absolute paths to their textures...
Here's a quick fictitious example...
The model "small_rocks.p3d" is found in the location P:\A3\Rocks\
The "P:\" part is removed, so inside that small_rocks.p3d model are paths to the textures which read "A3\Rocks\Data\<the texture.paa>"
Regardless of where you put that model on your P:\ drive - it will still look along that path for its textures, So when you add that model to the TB library, place it on your terrain and check it out in buldozer - there's the rock, and, if the textures are present at the correct location, its a textured rock...
Now... lets say you want to use Icebreakers plants package, which he created for his own terrains. Icebreakr's usually OK with that sort of thing (though it's usually considered polite to ask first) so, the first thing you need to do is to put the contents of that "ibr_plants.pbo" on to your P:\drive - somewhere - so you can add them to TB and use them.... So you unpack the .pbo and you get a folder called "ibr_plants"... So far, so good...
Now, where do you put it?
Lets say you just dump it in the P:\A3 folder, then you open TB and add the models to the library from that location... You add some trees to your terrain and check them out in buldozer...
The models are there OK, but the textures aren't!... Why's that?
Inside every one of the models there are paths to textures... the model is trying to follow those paths and it's not finding the textures where it hardcoded expects them to be...
So - how do you know where to put the ibr_plants folder so it works properly??
Well... at some point in the past, Icebreakr made this models pack, and he did that - somewhere - on P:\...
As you unpack his final result from that job, the ibr_plants.pbo, Mikeros ExtractPbo tool - should - create a file, probably called "PBOPREFIX.txt" ... This is a simple text file which contains.... The Original Path to the location where Ice made the plants pack... This is the path thats hardcoded in the models, this is where the models are looking for their textures...
Since you can't edit those models and change the internal paths, you need to make sure you put the models and textures in their correct, original place, and use the models from THAT location when you add them into TB for use... That way, the model looks along its hardcoded path for the texture, finds it, and all is well...
Better still, in game, when you load your terrain, it'll look along the same paths (basically, it'll look for that ibr_plants.pbo, find it, and use both the models and their textures successfully)...
So - you look at the pboprefix.txt file, it says "ibr_plants\" and nothing else.... Imagine the P:\ back on to the beginning of that path and you have "P:\ibr_plants\" - THATS where the folder needs to go - directly on P:\
If you unpacked one of my pbo's like "afghan_city_objects.pbo", and the pboprefix.txt file read "bush\terrains\afghan\afghan_city_objects\" then you'd need to recreate that path on your P:\ drive... Make a P:\bush\folder, with "terrain" and"afghan" subfolders, then finally drop in the unpacked "afghan_city_objects" folder at that location, and add them into TB and use them from there....
Your terrain is an addon, all its paths to models (and their textures) are hardcoded too, so now you have paths hardcoded into your .wrp which read "look for ibr_plants for the models and ibr_plants\data for their textures" (the P:\whatever\if\anything\ part of the path is ignored, the game looks directly for "ibr_plants", or rather, its packed equivalent "ibr_plants.pbo")...
Next... Since your terrain now relies on this "external pbo" you need to tell your main terrain config that, so it will error and prompt the user if that now essential extra .pbo is missing... Something like...
requiredAddons[] = {ibr_plants};
would probably do...
And, of course, you'll either need to include the ibr_plants.pbo with your final package, or inform your users that its a "required file" which they can get by downloading any Icebreakr terrain where it's used.. Or, if they simply have an Icebreakr terrain which uses that .pbo loaded at the same time as yours, that would also ensure that required file was available...
B
-
9
-
-
Remember that the _co / _nopx (or _nohq) ground texture tech has been around since Arma 1... If you take a look through the back catalogue of Arma 1, Arma 2, OA and assorted DLC data which BI has released, you'll find a whole load more good textures from all the terrains which were included with those games/expansions/etc, all of which are basically ready-to-use in Arma 3.
B
-
Absolutely correct BLB!
In fact, there's actually MORE processing done to the mask than the sat layer during the slicing procedure...
As the mask is tiled, the routine also analyses every pixel/colour on the mask tile, compares this to the Layers.cfg for "known" colours (and to the MapLegend.png if it encounters an "unknown" colour) and creates accompanying .rvmat files for each tile to handle the different surfaces found on each mask tile...
In contrast, the sat is pretty much just tiled up to match and dumped in the folder..
The increased processing time for Sat tiles is purely down to the complexity/colour count of that "real/photographic" image... Compare the filesizes of a Sat/Mask pair, bearing in mind the actual physical size and pixel count in both - should - be exactly the same.... There's the difference right there, the "big" image takes longer...
B
-
2
-
-
I didn't know about Text FXMe neither! Thanks very much for the tip! - That's definitely gonna be handy sometime! :)
B
-
Did you hit the "Enter" key after setting the parameter to "0"?
One of the things that used to annoy me and catch me out regularly when I started making VBS terrains at first was that in that old early version iof Visitor 4 I was learning on (which was pretty much identical to TB), parameters like "polyline widths", relative and absolute heights, etc - all the parameters you could manually type into in the Properties panel, didn't seem to "take" until I actually hit the Enter key after setting the value I wanted...
Such a dumbass little hassle - it took me WEEKS to get into the habit of always hitting "Enter" rather than just sitting there wondering why things weren't working...
Not sure if TB is the same, but it's worth checking just to see if it really is that simple a solution...
B
-
It's always a good idea to check out the BI terrains themselves when looking at parameters like these which are basically a compromise between visual quality and performance - see what sort of figures BI settled on for their various terrains.
You also might find that with a smaller, lighter-weight terrain, you can lean the numbers more towards visual quality, whereas if you're up there with Altis on the area/object count stakes, then leaning slightly more towards performance might be a useful compromise...
All four of these parameters basically control clutter (and ground texture) density, visual quality and range... Here's what each does in a little more detail...
clutterGrid = x.xx;
The clutterGrid size essentially determines clutter Density. You already specify the relative density of the different clutter models in your mix via the cfgSurfaces "Surface Character" section - this parameter controls the overall density. Lower numbers will provide higher density clutter (a nice thick "carpet" ), but possibly at the cost of some performance.
clutterDist = xxx; (in meters)
Imagine this parameter as a large circle, centred on the player. The value specified is the radius of that circle. Outside this circle, clutter won't appear at all, so this is basically your overall Range Control. Remember that all the parameters affect each other, so a Big range combined with a High density is a double-drag on performance...
fullDetailDist = xx; (in meters)
In game, directly under your feet - unless you have extremely high clutter density - you'll be able to see the actual underlying ground texture which is in use on this particular surface. It should/will be in nice hi-res quality and you may even notice a little parallax happening too - in other words, you're seeing the Ground Texture at "Full Detail"
This parameter is another "circular range around the player" - this time it controls the distance out to which those ground textures will be displayed at their full, maximum quality.
One important point to note with this particular parameter is that it MUST always be greater than your underlying heightmap cell size!
noDetailDist = xxx; (in meters)
As you've probably guessed, this parameter handles the other end of the range specified by the fullDetailDist above - in this case, it controls the point at which the detailed ground textures themselves fade out completely, and are replaced by the satellite imagery.
To smooth this transition slightly is the purpose of the "Middle MCO texture" which you specify elsewhere in your main config. That's basically an "additional detail overlay" texture.
It - should - start to kick in at round about this range so the general intention and aim is to achieve a reasonably smooth transition from...
Underfoot/Close Range -----------------------> Mid Range ----------------> Quite Far away -------> Very Far Away
Close-up texture (plus clutter) > Sat imagery+middle mco (plus clutter) > Sat imagery + middle mco > Sat imagery only
If you get the balance between this lot reasonably good (always bearing performance in mind, of course), and your overall colours and tones of groundtextures/clutter/sat imagery all match reasonably well, you can achieve a pretty smooth visual blend between the different ranges...
B
-
3
-
Bush's "Strange New Worlds"
in ARMA 3 - ADDONS & MODS: COMPLETE
Posted
I - sortof - am...
BI have received quite a lot of.... feedback... about the new "visual upgrade" so I think, like many other current terrain guys, that I'll wait and see if further engine tweaking takes place before getting involved in fundamental recolouring and reconfiguring of actual terrains to suit what may not yet be BI's "final take" on the lighting conditions...
So, in short - no fix for these at this current time at least, sorry...
B