malkekoen 17 Posted January 19, 2011 Okay so I'm starting up sloowly on a map project, everything is cool. I've read almost all there is to read :rolleyes: and and did some tutorials. Now I've created my own heightmap and wanted to test drive it in real Arma, no objects or textures, just to have a look at the heights etc. So my setup is this: Heightmap: 512 Cell size: 4 Size: 2048 m I've created a white sat image, and a white mask as a place holder for being able to export the island. Both are 2048 px. When using the calculator, having tried all combinations with 4*4 up to 1024*1024 image slices, the result is the same. In Buldozer about 30% of the map is black, which is strange as the entire sat image is white. I get no warnings during the process, but it somehow seems like the sat image is too small. I can load the map in editor, but a warning that it can't file a 000.000.001.rvmat file or something appears, and if preview is selected it crashes. I guess it relates to missing sat textures, but I just can't figure this out! Can anyone please leave a hint of advice? Share this post Link to post Share on other sites
bushlurker 45 Posted January 19, 2011 (edited) Sounds like you're heading in the right direction... The cell size is a little unusual - 512px heightmap with cellsize 4m for a 2048x2048m hi-res terrain...! Sounds interesting! Not sure how it'll fare performance-wise, but it shouldn't cause issues in Visitor... First thing I'd say is to replace the all-white test Sat_lco... Buldozer uses white to mean "texture not found"... use a picture of your cat - anything - just something with pixels on it so you can see if it actually is "draping" properly across the landscape... A matching 2048x2048 plain white mask should be fine... you'll need a basic Layers.cfg file with a single groundtype defined, and the mask colour white assigned to that groundtype... And you'll also need a basic cfgSurfaces.hpp - also defining that single groundtype... Sgt Ace's tutorial uses a basic single demo groundtype in this way - you could use the appropriate configs from that with a little repathing... Reimport "satellite and mask" in Visitor with all these files in place and see what happens... If you've got problems with the layers or surfaces files - post what you're using and we'll take a look... B Edited January 20, 2011 by Bushlurker Share this post Link to post Share on other sites
malkekoen 17 Posted January 20, 2011 (edited) Hi Bushlurker, Thank you very much for your reply, you're really helpsome! I did already try with an image, but it didn't work. I did it again from scratch now just to be sure, but I have a problem with Visitor. When I import files directly from Photoshop, like this, it crashes. Below I've added a screenshot of my source folder with the files, and the Show Details from my sat_lco.png file. free image uploader Why does it crash? I've taken care to save it in 8-bit PNG, and the size should also be correct. Previously I've imported the images to Wilbur and saved it there in 8-bit, that somehow seemed to work. But this time even that won't work. What is the issue with my PS files? My config file, besed on the tutorial posted here by Atsche (very helpful). class Layers{ class sm_grass { texture = "The_Coast\the_coast\data\sm_grass_mco.png"; material= "The_Coast\the_coast\data\sm_grass.rvmat"; }; }; class Legend { picture="The_Coast\the_coast\source\mapLegend.png"; class Colors { sm_grass[]={{255,255,255}}; }; }; The main directory for my map: free image uploader The data directory: image upload The cfgSurfaces.hpp file: class CfgSurfaces { class Default {}; class SMgrassSurface : Default { files = "sm_grass_*"; rough = 0.1; dust = 0.1; soundEnviron = "grass"; character = "sm_grassClutter"; }; }; class CfgSurfaceCharacters { class sm_grassClutter { probability[]={0.79,0.1,0.1,0.01}; names[]={sm_GrassCrookedGreen,sm_GrassCrooked,sm_AutumnFlowers,sm_WeedDead}; }; }; I'm working on a map I call "The Coast", based on the levels in Half-Life 2 with the same name. First time I make a map, and I haven't been doing much computer-related since I took a bachelor in 3d design 6 years ago. I wanted details and focus on the intensive wasteland, so I went for a rather small map. upload images Keep in mind that the red lines and such are just very quick sketches just so you get an idea. Edit: added cfg file Edited January 20, 2011 by malkekoen Share this post Link to post Share on other sites
bushlurker 45 Posted January 20, 2011 (edited) Hi malkekoen! OK - thats all looking pretty good all round! a "PMC Proving Ground" style terrain - theres been a bit of chat recently about this sort of idea... sounds very interesting! Your configs look fine... normally I'd suggest you change that "sm tag" on the class and filenames - do a bulk replace of everything, including actual texture filenames with your own "tag" like... class malk_grass { texture = "The_Coast\the_coast\data\malk_grass_mco.png"; That would avoid future conflicts both with the tutorial you followed, and anybody elses island who followed the same tutorial but didn't change the tags... but just for testing purposes thats hardly critical, so don't worry about that just yet... I reckon the problem IS definitely as you suspect - just wrong bitdepth for the actual files... nothing more serious than that... If people ask about this I usually just repeat the advice from the Wiki/Sgt Aces tutorial... "16bit greyscale for heightmaps, 8 bit colour for Sat & Mask"... but I'm not sure if that's literally true..... the 16bit for heightmaps has been discussed before - thats definitely superimportant - and correct... but the Sat & Masks.....? Normally I don't fuss with this at all - I hit "save as png" in Photoshop, and the only dialog you see is "do you want interlace" and I say "no"... But - if you think about it - it can't be a pure 8bit image - that would be a mere 256 colour palette! If I load up one of my Mask_lco's into Photoshop and look at the "Image/Mode" menu it says "RGB - 8 bits per channel" - that makes a lot more sense... Heightfield = a single channel greyscale with 16bit depth Sat & Mask = 3 channel RGB with 8bit depth per channel ... so technically, that would make the files 24bit! Just to complicate matters - I took a look at the same windows info panel you posted a screenshot of... here's mine... This says my mask_lco is actually "32 bit"! - there must be a fourth channel in there for transparancy/alpha - which is also 8 bit... doesn't seem to be a problem though - the files are working fine... So - the "8 bit" thing apparently means "8 bits per channel" rather than the heightfields "16 bits per channel"... does that make sense? Everything else looks OK at first glance - try fooling with that image format - I think thats the only problem... should be easy to fix... Good luck... B Edited January 20, 2011 by Bushlurker Share this post Link to post Share on other sites
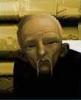
malkekoen 17 Posted January 20, 2011 Hi again. Thank you very much for your kind help, it is much apprecieted. Learning these tools can be quite frustrating as you all know! I'm completly new to this so sorry if I ask a bit silly. The bit thing is solved, I did as you said and saved 8 bits/channel and solved the problem! I thought it was 8 bit there... That's great! :bounce3: Ok, as the picture shows this is the next problem. It has always done this as I load in the editor, and if I place a unit and "previews" it crashes. So there's a problem somewhere with the layer files created by bulldozer? What to do? It never said anything during the process, neither did BinPbo... In Bulldozer it looks normal, the sat_lco.png is nicely draped. Can it have something to do with the fact the island continues towards the east? free image uploader Concerning the map I see at as a kind of Utes/Proving Grounds synthesis with a Half Life 2 story added for spice. After having tried PG I'm a little spoiled with the fine resolution and is having difficulties coping with the larger ones :rolleyes: Share this post Link to post Share on other sites
malkekoen 17 Posted January 21, 2011 (edited) Allright sorry for bumbing, but I seem to have found the source of the problem. My technical knowledge is just not good enough to really understand the problem. Apparently the "bin" folder in the P:/ directory contain all the shaders. The thing is that now we have changed version, with OA and such, and when trying to load the shaders compiled by Visitor and Buldozer they are sort of out of date when going in game. I then tried to load the map in old Arma2, no addons or beta or anything, but it still made the same error as above. I stumpled across this line in Atsches tut: Hint: If you are using arma2.exe from your present game version then you need to replace the bin folder in p:/ with the extracted bin.pbo from your present game version too, otherwise there is a mismatch of shaders. Ok, so I tried to unPBO the following "bin": S:\Steam\steamapps\common\arma 2 operation arrowhead\Expansion\beta\expansion\dta\bin.pbo But now buldozer can't load the map. Does anyone know how to get across the problem? EDIT: Problem solved! I changed the path from: p:/the_coast/the_coast to p:/HL2/the_coast Apparently visitor or binPbo doesn't like the similar name twice! Edit: Nah, didn't really work! Just once, but now it doesn't anymore. Strange. Edited January 21, 2011 by malkekoen Share this post Link to post Share on other sites
bushlurker 45 Posted January 21, 2011 (edited) I've seen this "cannot load material file 000.000.001.rvmat - or whatever" error reported a few times before, though I can't immediately find the posts - except for poor old Geo in the Sgt Ace Tutorial thread... same error - nobody answered him :( I can't immediately remember what caused it either :(, though I'm guessing it was bad pathing somewhere - either in the main config or in BinPBO itself, so I guess the obvious thing to say is - can you post the main config.cpp and the BinPBO settings you're using? - we've seen the basic layers and surfaces configs - they look OK... presumably the little basic clutter config is also OK... Main config and/or BinPBO settings or pathing is my primary guess for the afternoon ;)... should be something simple - lets see them and we'll try to spot it... B Edited January 21, 2011 by Bushlurker Share this post Link to post Share on other sites
malkekoen 17 Posted January 21, 2011 Thanks again Bushlurker, i've posted a quite thorough step-by-step explanation of what I did here: http://forums.bistudio.com/showthread.php?t=85579&page=15 You can scroll down, due to the picture size limit it spans over several posts. I returned to the original tutorial by SgtAce just to see if did somethings wrong, but it's the exact same problem. I've through everything! All paths, files checked over and over. I have tried running everything as admin, but strangely then Visitor can't find the p: drive, and programs such as Buldozer and BinPBO doesn't work either. So I just run it normally. Strangely, just after having renamed one folder it worked, but the next time it didn't. Share this post Link to post Share on other sites
granQ 293 Posted January 24, 2011 everytime I got problem with import its one of two things.. a) the image isn't 24 bits (you discussed that, i always use 24 bits) b) the size in project parameters and image difference.. all I could help with.. you could setup the P:\ manually http://en.wikipedia.org/wiki/Subst Share this post Link to post Share on other sites
malkekoen 17 Posted January 25, 2011 Thanks, both these things should be OK. I'm currently away from my rig, but I think I will try and do clean install of all my tools later. Share this post Link to post Share on other sites